Looking for a creative way to spice up your class blog? Follow these simple steps to embed a Google Slide show to introduce your class.
STEP 1: Give your students a template
Click HERE to get your own copy. Share this template with you students. I use Google Classroom and allow my students to “edit” the presentation. Each student has a number, and they are only allowed to work on that assigned number. Are there hiccups? Of course! Sometimes slides get deleted or backgrounds get changed. It’s a risk that we are willing to take, and we learn a lot in the process. Here’s a tutorial by Alice Keeler.
PLAN B: If that seems too risky for your class, try option 2. It’s a little more time consuming on the teacher’s part, but just as effective. Instead of giving the whole class access to edit the entire presentation, just share one slide with them via Google Classroom and merge all of them together in the end. Whoalah! (It’s always best to give them a template to start).
Tip: My class always uploads a screenshot of the avatar. That way we don’t need to bother with downloading and uploading from the sites. That can get tricky.
STEP 2: Create a title slide
You will notice that I have the title slide at the end of the template presentation. There is a reason for this! My students each have a number that they identify with all year long (1-30; depending on the number of students I have). If number 1 starts working on “slide 1” then that cannot be the title slide. (I’m expecting a light bulb moment now.) Before you post your Google Slideshow, just click on the title slide (last position) and drag it to the top! Boom!
STEP 3: Post presentation to blog
It’s time to share our masterpiece! The cool thing about this is that students can continue to edit and finish their slides even after it is posted on your blog. Follow these steps to introduce your class!
In Google Slides:
- Go to File, and “publish to the web…”
- Click “Embed” next to “Link”
- Choose a slide size (I like medium) Here’s what my settings look like
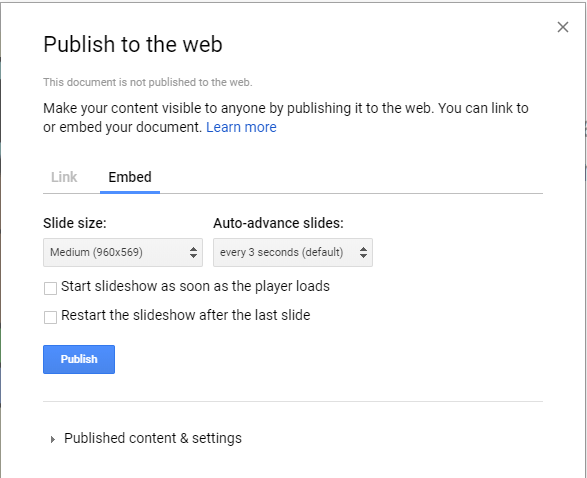
- Click “Publish
- Highlight and copy the embedded text
Now head on over to your blog!
On your blogging platform, you will want to {paste} this embedded code when inserting media. Here’s a quick tutorial if you are using Edublogs as your platform. If your are using a different blogging platform, please check with the relevant help guide.
Here is a link to my “Meet the Class” post.
Please comment below if you have any questions! Keep blogging!
Hi, how did you get this template with the worm and fish in animation?
Great question. If you have an Edublog’s account you can change the theme of your blog. If you don’t have an Edublog’s account, the following steps might sound super confusing. (wink, wink)
From your “dashboard”….
1. Click “Appearance”
2. Click “Themes”
3. Click “Something Fishy”
4. Click “Activate”
And wa-lah! Your blog is now “fishy”
Hope this helps.
How do your students create their avatar?